Create a Dreamy, Glamour Effect
This is a Photoshop tutorial on creating dreamy, glamour effects on ordinary photos. It smoothens skins and can reduce aging lines. Click on picture to view full size image. The smaller photo doesn't do justice to the screen captures.
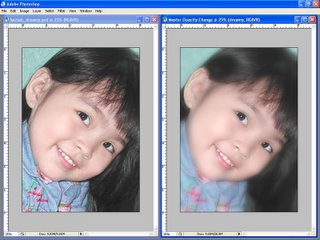
1. Open your Photo and duplicate the background layer twice (Control + J)
2. Name the layers Darken and Lighten. (Double click on the layer name)
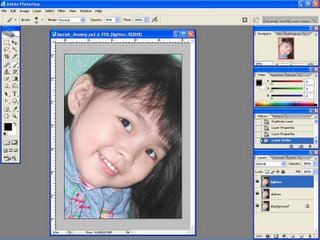
3. Choose the Lighten layer. Choose Filter > Blur >Gaussian Blur with radius of 30 pixels and set the layer opacity to 60%. Change blending mode from Normal to lighten.
(pixel radius may vary. 30-35 pixels is a good start for hi-res photos)
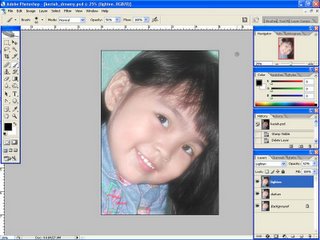
4. Choose the Darken layer. Choose Filter > Blur >Gaussian Blur with radius of 25 pixels and set the layer opacity to 40%. Change blending mode from Normal to darken.
(you may choose to disable visibility of other layers to see the effect)
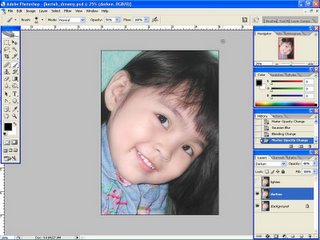
5. Click the Darken layer. Shift + click the Lighten Layer. Right click on the layers and Choose Merge Layers.
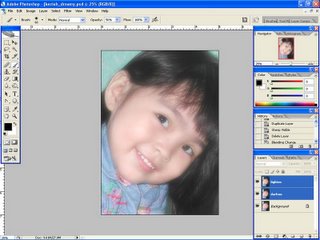
6. Name the (merged) layer Dreamy. Add a Layer Mask ( choose Layer > Layer Mask > reveal all)
(Reduce layer opacity if desired)
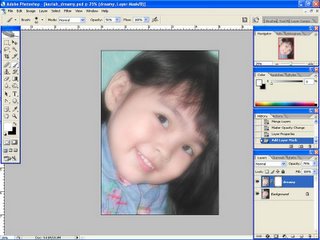
7. Choose a small brush with soft edges and reduce brush opacity to 50%
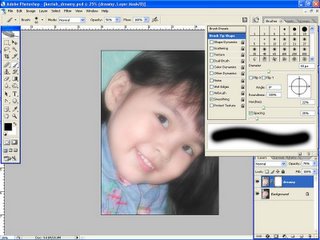
8. Make the foreground color black. Click the Layer Mask
9. Brush along the lips, eyes, eyebrows, edges of nose and ears to reveal details from the background layer. The viewers eye gravitate towards the sharper details, this is a basic technique for good portraits.
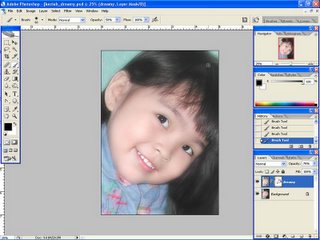
10. Paint back with white if you make any (brushing) mistakes.
11. Flatten the image (Choose Layer > Flatten image)
12. Save as another file. It is a good practice to keep the original file for future reference.

We will achieve this

1. Open your Photo and duplicate the background layer twice (Control + J)
2. Name the layers Darken and Lighten. (Double click on the layer name)

Click picture to view full size
3. Choose the Lighten layer. Choose Filter > Blur >Gaussian Blur with radius of 30 pixels and set the layer opacity to 60%. Change blending mode from Normal to lighten.
(pixel radius may vary. 30-35 pixels is a good start for hi-res photos)

4. Choose the Darken layer. Choose Filter > Blur >Gaussian Blur with radius of 25 pixels and set the layer opacity to 40%. Change blending mode from Normal to darken.
(you may choose to disable visibility of other layers to see the effect)

5. Click the Darken layer. Shift + click the Lighten Layer. Right click on the layers and Choose Merge Layers.

6. Name the (merged) layer Dreamy. Add a Layer Mask ( choose Layer > Layer Mask > reveal all)
(Reduce layer opacity if desired)

7. Choose a small brush with soft edges and reduce brush opacity to 50%

8. Make the foreground color black. Click the Layer Mask
9. Brush along the lips, eyes, eyebrows, edges of nose and ears to reveal details from the background layer. The viewers eye gravitate towards the sharper details, this is a basic technique for good portraits.

10. Paint back with white if you make any (brushing) mistakes.
11. Flatten the image (Choose Layer > Flatten image)
12. Save as another file. It is a good practice to keep the original file for future reference.


